Custom sensors, buttons and quick actions
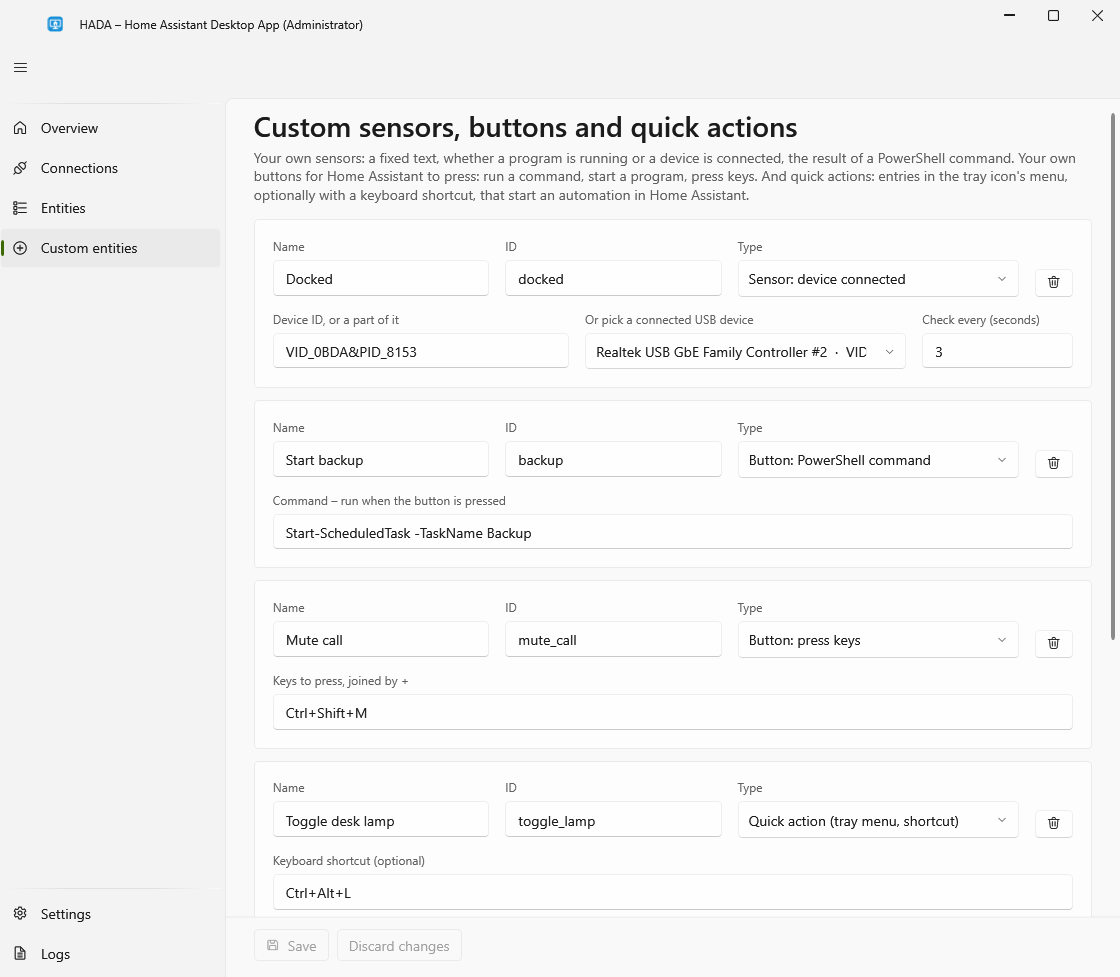
On the Custom entities page you define your own sensors:
| Type | Becomes | What you enter |
|---|---|---|
| Fixed text | sensor | A value that stays the same until you change it, e.g. the room the computer is in |
| Program is running | binary sensor | A process name such as chrome. On while at least one such process runs; the count is in the instances attribute |
| PowerShell command | sensor | A command; whatever it prints becomes the value. Example: [math]::Round((Get-PSDrive C).Free / 1GB) with the unit GB |
| Device is connected | binary sensor | A part of a device's ID, such as VID_0BDA&PID_8153, or pick one of the connected USB devices from the list. On while such a device is connected: a USB-C dock, a drive, a headset |
And your own buttons, which Home Assistant can press from a dashboard or an automation:
| Type | What you enter | Where it runs |
|---|---|---|
| Button: PowerShell command | A command, e.g. Start-ScheduledTask -TaskName Backup |
In the service, so as SYSTEM when installed, without a desktop. It may take up to 10 minutes; pressing the button again meanwhile is ignored |
| Button: start a program | A program with its arguments, a document, or an address: "C:\Program Files\App\app.exe" --option, notepad, https://example.com |
On the desktop of the signed-in user, with that user's rights, so the tray app must be running. Put a path that contains spaces in quotes |
| Button: press keys | A key combination, e.g. Ctrl+Shift+M, F11 or MediaNext | On the desktop of the signed-in user, as if typed; the program that has the focus gets the keys |
What a button does is fixed in settings. Home Assistant can only press it; it cannot send a command of its own.
Keys are joined by +: any of Ctrl, Alt, Shift and Win, then at most one key: a letter, a digit, F1 to F24, or one of Enter, Tab, Space, Esc, Backspace, Delete, Insert, Home, End, PageUp, PageDown, Up, Down, Left, Right, PrintScreen, Pause, VolumeUp, VolumeDown, VolumeMute, MediaPlayPause, MediaNext, MediaPrevious, MediaStop. Windows keeps its own secure shortcuts, such as Ctrl+Alt+Del and Win+L, out of reach, and ignores injected keys while a program running as administrator has the focus.
Quick actions
New in 1.1.0.
A quick action goes the other way: it lets you start something in Home Assistant from the computer. Add one with the type Quick action and give it a name; a keyboard shortcut is optional, and must include Ctrl, Alt or Win.
- It appears in the menu of the HADA tray icon, with its shortcut next to it.
- The shortcut works whichever program has the focus. If another program already uses it, the menu entry still works, and the tray app's log says so.
- In Home Assistant it appears as a trigger of the device: in the automation editor choose Device, the computer, and the quick action's name.
By itself a quick action does nothing; an automation says what it does:
automation:
  - alias: Toggle the desk lamp from the laptop
    triggers:
      - trigger: mqtt
        topic: hada/laptop/event/quick_action
        payload: toggle_lamp
    actions:
      - action: light.toggle
        target:
          entity_id: light.desk_lamp
The payload is the quick action's ID. With several users signed in, only the quick actions of the user at the computer reach Home Assistant.
Details
- The ID is the entity ID. Leave it empty to derive it from the name (
Gra włączona→gra_wlaczona). - Set a unit only for numbers. Home Assistant then treats the sensor as a measurement and draws a graph.
- A program is looked for, and a command is run, every n seconds: at least 2, by default 30.
- PowerShell commands are run by the service with Windows PowerShell 5.1, so as SYSTEM when installed. They cannot see your desktop or the files and settings of your user account. A command must finish within 30 seconds; if it fails or prints nothing, the sensor keeps its last value and the reason appears on the Logs page.
- A device is matched against the instance IDs of all connected devices, ignoring case, so any part that identifies it works; Device Manager shows the full ID under Details → Device instance path. The check is cheap, so an interval of a few seconds is fine.
- Removing a custom sensor or button also removes it from Home Assistant.
Example: is the laptop docked?
A monitor on a smart plug should be powered only while the laptop sits in its USB-C dock with the screen on. Whether the laptop is charging does not say that, since a plain charger charges it too. Neither does external_display: once the plug is off, the monitor has no power and Windows no longer sees it. The dock itself does: its own devices, such as its network adapter, are there whenever the cable is plugged in.
- With the laptop docked, add a custom sensor of the type Device is connected, pick a device that belongs to the dock from the list, name it Docked, and set it to check every 3 seconds.
- In Home Assistant, let the plug follow both sensors:
automation:
  - alias: Monitor power follows the docked laptop
    triggers:
      - trigger: state
        entity_id:
          - binary_sensor.laptop_docked
          - binary_sensor.laptop_display
    actions:
      - action: >-
          switch.turn_{{ 'on' if is_state('binary_sensor.laptop_docked', 'on')
          and is_state('binary_sensor.laptop_display', 'on') else 'off' }}
        target:
          entity_id: switch.monitor_plug
While the laptop is asleep or off, both sensors are unavailable, which also turns the plug off.